
Getting started with EPM - Endpoint Privilege Management
EPM, short for Endpoint Privilege Management, is Microsoft’s tool from the Intune Suite to control, audit and manage administrator rights on Windows endpoints (macOS is not supported as of yet). It falls under a category we refer to as a PAM solution for endpoints. Having a PAM solution for your endpoints is absolutely vital to control and audit the use of elevated processes.
Some organizations have chosen to remove local admin rights altogether, but there are times when users need admin rights to do their job, e.g. changing system settings for development purposes, installing apps that aren’t in the existing app catalogs, or just general supportability - the list can be endless.
If we don’t have a good and secure way to facilitate elevated privileges on behalf of the end user, guess what? They are going to log a ticket with the ServiceDesk, or they are going to resort to shadow IT. That’s where a good PAM solution comes in. Not only does it eliminate the need to log a ticket with the ServiceDesk, it also facilitates the elevation without compromising security.
EPM is ever-changing, and we can expect more changes over time as the product matures, so keep checking back on this blog as new features get added, as I will keep this post updated :)
LAPS is not a PAM solution. From a security perspective, it is highly undesirable to use LAPS as a general means to elevate processes on end users’ devices, unless it’s for emergency/break-glass purposes.
At its core, EPM gives you the following functionality:
- Allow standard users to elevate processes in a guarded environment
- Eliminate one-time installs of software
- Reporting/auditing of administrator usage across your estate
- Support for Windows - macOS is not supported as of yet
Getting started with EPM
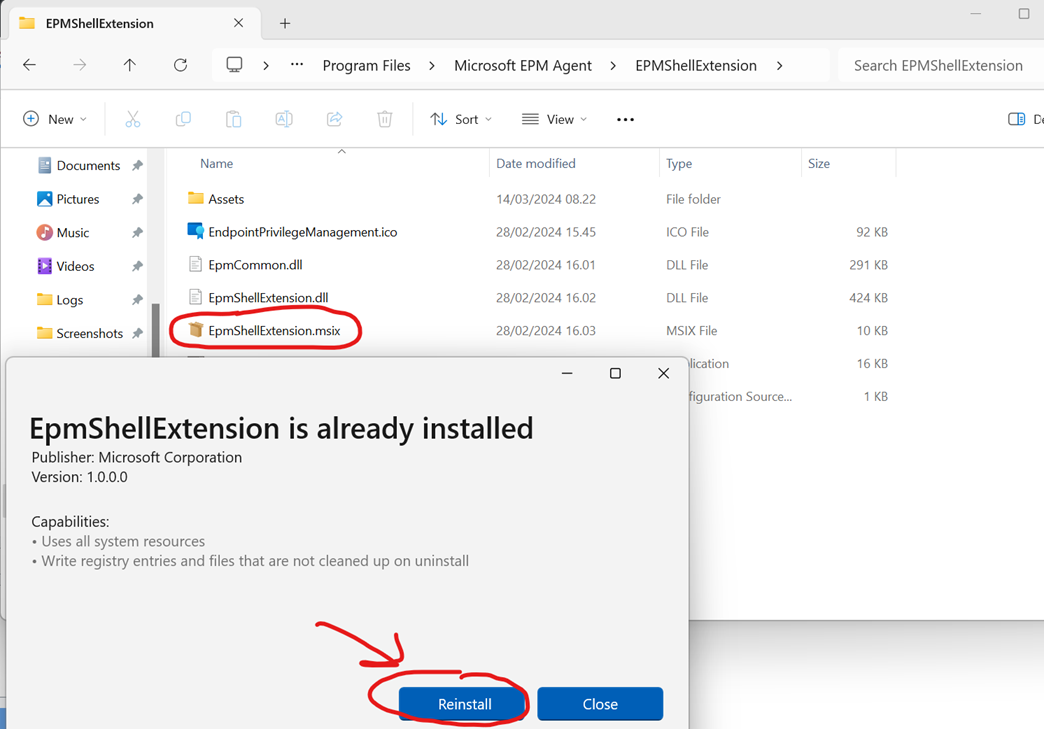
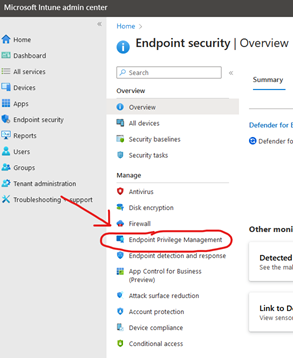
Getting started with EPM is very simple and only takes a few clicks. Before we do anything, make sure you have the correct licensing by heading to the Intune admin center > Tenant Administration > Intune Add-ons, and check that either Microsoft Intune Suite or Endpoint Privilege Management is active. Once it’s activated, you will get an extra pane under Endpoint Security called “Endpoint Privilege Management”.
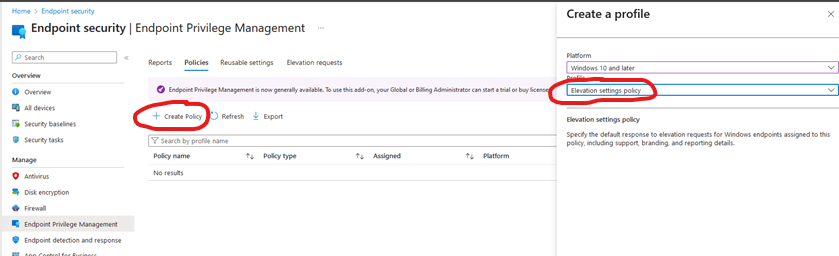
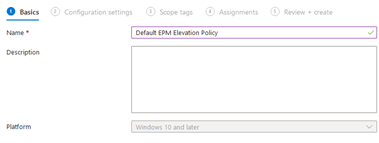
Head over to the Endpoint Privilege Management section, click “Create Policy” and select “Elevation Settings Policy”. This is the policy that enables EPM on your devices. Give it a friendly name, e.g. “Default EPM Elevation Policy”.
The next section is basically the on/off lever for EPM. We leave all of the settings at their defaults. Most of them are self-explanatory, but the one to pay close attention to is the “Default elevation response”, as it has a big effect on the end-user experience:
- Not Configured: Always defaults to “Deny all requests” for end users, UNLESS an elevation rule has been crafted for the given process.
- Require user confirmation: The most relaxed option. The end user simply confirms the risks of an elevation and can then elevate any process - no specific elevation rule is needed, and no approval from IT is required.
- Require support approval: The end user can request elevation of any file, regardless of whether a rule has been crafted for it. Someone from IT with the necessary access can then approve or deny the request.
For now, let’s choose “Not Configured” and leave everything else at the default. Assign a scope tag if required, and finally assign the policy to a test device of your choice using a group or a device filter.
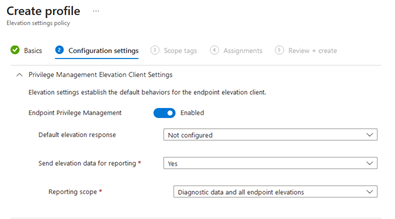
Microsoft recommends choosing “Not Configured” as the default elevation response for the majority of your users, to ensure full control of how administrator rights are used on your organization’s endpoints.
The nuts and bolts
Shortly after you assign the EPM policy to your test device, the EPM client will be installed automatically. It works the same way as the Intune Management Extension, which installs automatically as soon as you assign PowerShell scripts, remediations, Win32 apps or Windows Store apps to a device. No need to maintain these binaries yourself - Microsoft does it for you!
Once the client is installed, the most obvious change is that users will see “Run with elevated access” when they right-click a file. The EPM client is installed in C:\Program Files\Microsoft EPM Agent, along with a service that also shows up as a process in Task Manager.
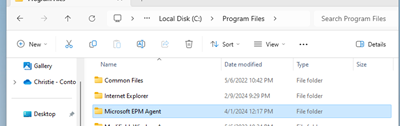
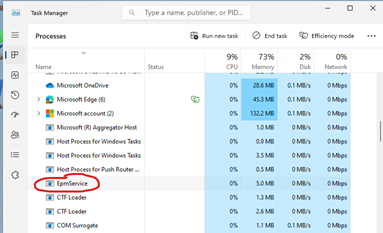
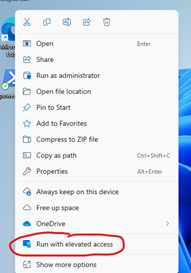
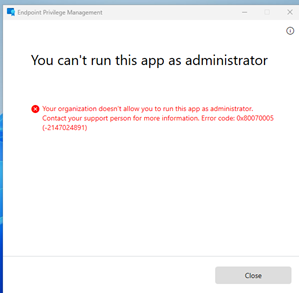
If you try to elevate anything at this stage, the user will simply be denied. Remember, we set the “Default elevation response” to “Not Configured”, meaning users can only elevate apps that we have created specific rules for. We will get to crafting those rules in a moment.
Microsoft has created a new, super-fast channel for delivering EPM policies, called MMP-C! EPM was the first Intune feature to use this new channel. Depending on who you ask, this is referred to as being “Dual Enrolled”, since the device now has 2 separate channels for policies - super nice!
Crafting an elevation rules policy
Craft elevation rule to allow 7zip 24.03 beta .exe using file hash
Now we will craft our first elevation rules policy to allow 7zip, using the file hash. A file hash gives you the strongest detection for a specific process, as the hash is unique for every single file. That way, we ensure only the exact file we specify is allowed to run with elevated rights.
I will take you through every step of creating the policy.
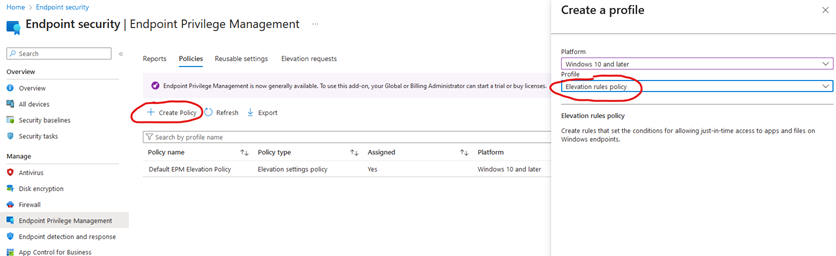
Head over to Intune > Endpoint Security > Endpoint Privilege Management. Click “Create Policy”, choose “Windows 10 or later” and select “Elevation Rules Policy”. Give it a nice name like “Default Elevation Rules” and click “Edit instance”.
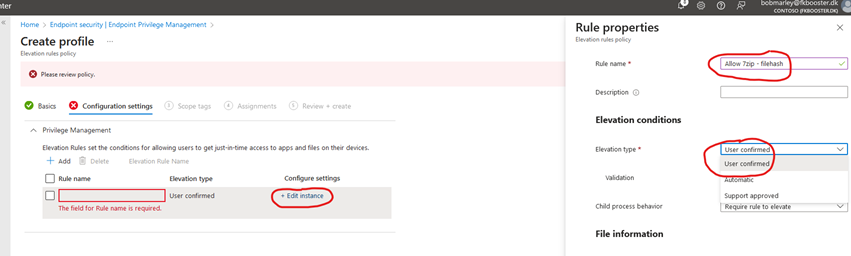
In elevation type, we have the following options:
- User Confirmed: The user has to confirm when elevating an app.
- Automatic: The app elevates without user confirmation. Best practice is to only use this for legacy apps that don’t work with User Confirmed or Support approved.
- Support approved: IT Support has to approve the elevation request before the user can elevate the process.
For now, let’s choose User Confirmed.
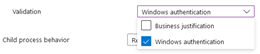
In validation, we have 2 optional boxes we can tick:
- Business Justification: The user has to provide a business justification before being allowed to elevate a process.
- Windows Authentication: The user has to authenticate using their Windows login. This can be a password, but it also works with Windows Hello and FIDO keys.
For now, let’s only choose Windows Authentication:
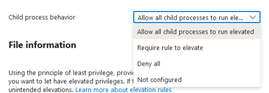
To finish specifying our elevation conditions, we need to select the child process behaviour. Be careful with this option, as a lot of installers spawn child processes to install dependencies. The options are:
- Allow all child processes to run elevated: All processes spawned by the elevated process are allowed to elevate. This is also the default in Windows when you right-click a file and select “Run as administrator”. A lot of app installers rely on this behaviour, so if you choose anything else, be sure to test thoroughly!
- Require rule to elevate: A child process needs its own elevation rule before it can run elevated. While this is more secure, I’d only use it for processes like
cmd.exeorPowerShell.exe- otherwise you will find yourself crafting a lot more elevation rules than you initially signed up for. - Deny All: The most secure option, but see the notes for option 2.
- Not Configured: Reverts to the default response, which is “Require rule to elevate”.
Let’s select “Allow all child processes to run elevated” for now:
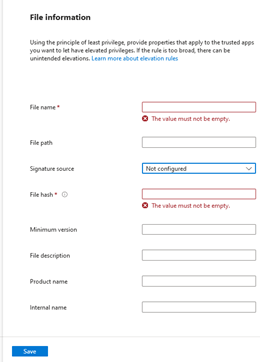
Finally, we need to provide the file information. Since we are using a file hash for this rule, set “Signature Source” to “Not Configured”. With that set, we only need to provide a file name and a file hash. The file name is easy, and there are a few ways to get the file hash - the simplest is the Get-FileHash cmdlet in PowerShell:
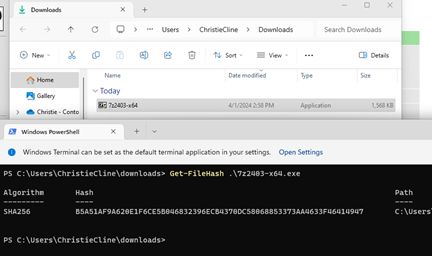
Once you have added the file hash, your policy should look like this:
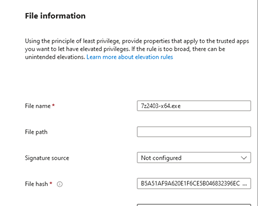
Once you are satisfied, let’s take the new elevation rule for a spin. Assign scope tags where required, then assign the policy to your test device. On the device, perform a sync from Company Portal. It can take 5-10 minutes before the policy is applied.
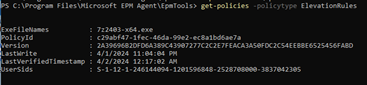
EPM has its own PowerShell module for troubleshooting and debugging. Run
Import-Module 'C:\Program Files\Microsoft EPM Agent\EpmTools\EpmCmdlets.dll', then runGet-Policies -PolicyType ElevationRulesto check whether any elevation rules have been applied to the device. If nothing is returned, the policies haven’t been applied yet. See Install the EpmTools PowerShell module for more information.
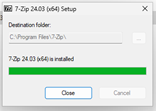
Now go to the 7zip website and download the 7zip 24.03 beta .exe on your test device. Right-click the file and select “Run with elevated access”. The user will first be prompted to confirm the elevation (User Confirmed), and then asked to verify their identity (Windows Authentication), exactly as we configured in the rule. After that, the user should be able to install 7zip without a hitch :)
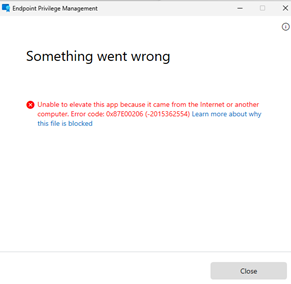
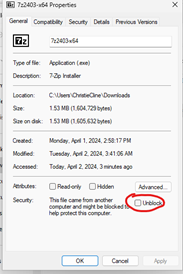
Windows security defaults dictate that files downloaded from the internet must be unblocked first. Use the
Unblock-Filecmdlet in PowerShell, or right-click the file > Properties and tick “Unblock” at the bottom of the dialog. If you don’t, EPM will not be able to launch the file! I have asked the EPM team at Microsoft to give a better error message for this particular scenario.
Craft elevation rule to allow Adobe Reader using Signing Certificate
For 7zip, we used a file hash. Now we are going to create an elevation rule using a signing certificate instead. A signing certificate adds an extra layer of security, as EPM calls a Windows API to verify the certificate’s validity and revocation status.
Let’s say we allow Adobe Reader to be elevated based on its certificate, and a week later, Adobe revokes that certificate for security reasons. EPM will then block any further elevations for all rules that use that signing certificate, until both the executable and the certificate are replaced.
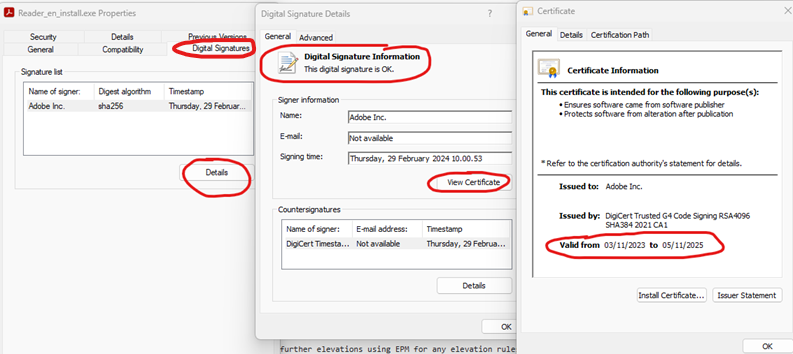
So how do we know if an executable is signed? Right-click the file and select Properties. If a “Digital Signatures” tab is present, the file is signed.
Next, validate that it’s signed with a valid certificate. Click “Details” and check that the “Digital signature information” says the signature is OK. Then check the validity period by clicking “View Certificate”. In the example below, I have downloaded the English version of Adobe Reader, and everything looks OK.
Now we need to craft a rule that allows this app based on its signing certificate. First, we import the signing certificate into Intune as a reusable setting, so we can reuse it across multiple rules without importing it over and over.
So what is the easiest way to export the signing certificate from a file? EPM PowerShell cmdlets to the rescue! Open an elevated PowerShell on a device with EPM installed, load the EPM module like before, and run the Get-FileAttributes cmdlet:
Import-Module 'C:\Program Files\Microsoft EPM Agent\EpmTools\EpmCmdlets.dll'
Get-FileAttributes -FilePath C:\Users\ChristieCline\Downloads\Reader_en_install.exe -CertOutputPath C:\Users\ChristieCline\Downloads\
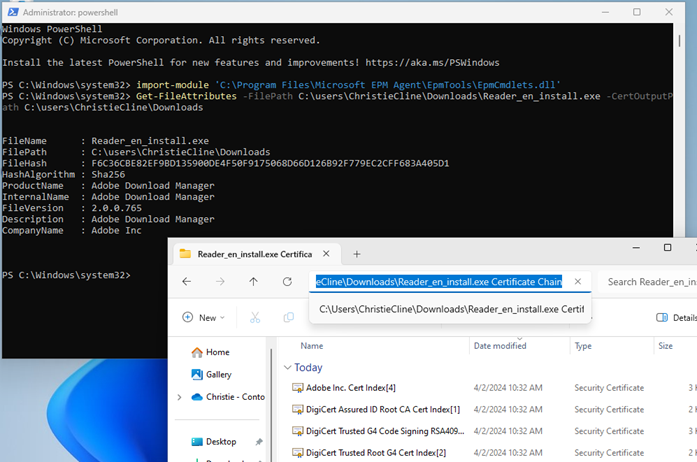
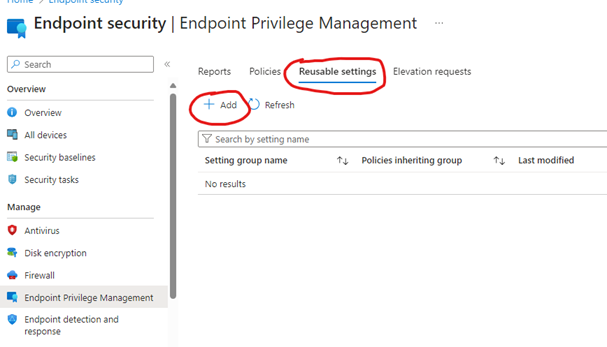
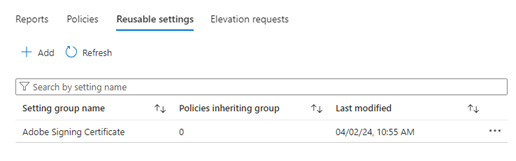
Now we have what we need. Head back to Intune > Endpoint Security > Endpoint Privilege Management, click “Reusable settings” and then “Add”. Name it “Adobe signing certificate” and import the exported Adobe signing certificate - it should be the one ending with the number 4.
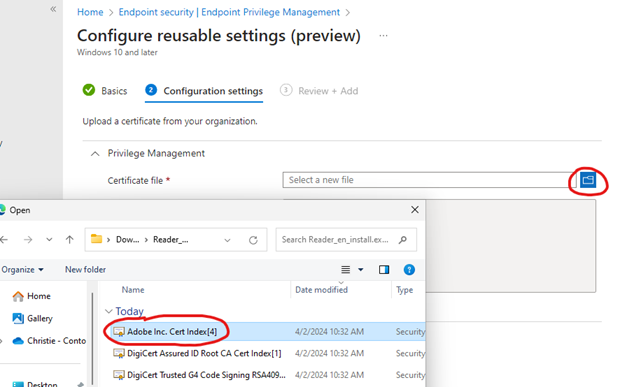
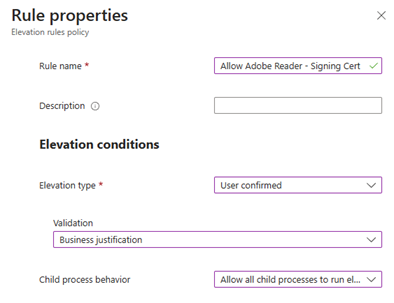
Time to craft the actual rule. Edit the “Default Elevation Rules” policy we created earlier and add a new entry with a nice name. Set Elevation Type to “User Confirmed”, set Validation to “Business Justification” this time, and set Child Process Behaviour to “Allow all child processes to run elevated”.
Now for the interesting bit - pay attention here, as this is really important!
- In the certificate section, click “Add or remove a certificate”. In the new view, select the signing certificate we imported earlier and click “Select” at the bottom.
- In certificate type, select “Publisher”. Remember, we imported Adobe’s signing certificate, which is a publisher certificate. This is by far the most common scenario - you should very rarely allow a certificate authority, as this could cause unpredictable and unexpected elevations using EPM!
- Once the signing certificate is added, you can already save the rule. But consider the impact: every file signed with this exact Adobe signing certificate can now be elevated with admin permissions using EPM. Is this what you want?
- Consider adding more attributes. If you only want to allow Adobe Reader, you could add a file name as well. But be aware that a file name on its own is weak: the user could download another Adobe product, rename the installer to that file name, and elevate it. If you only want to allow one specific app, add more of the file’s metadata - think
Get-FileAttributesagain.
- For this demo, save and apply the elevation rule with only the certificate - no file name or path.
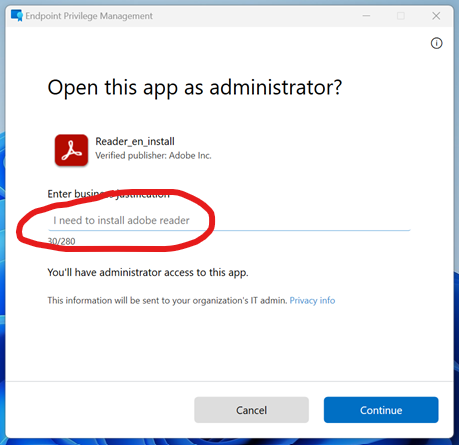
Sync from Company Portal and wait a few minutes for the new policy to arrive. Then right-click Reader_en_install.exe and select “Run with elevated access”. If everything works, you will get the EPM prompt, but this time the user only needs to enter a business justification before they can complete the installation.
Wrapping up
In this blog post we covered:
- What EPM is and what it currently offers
- What a PAM solution is
- How EPM deploys and works on the Windows endpoint
- How to craft elevation rules using the different levers and toggles at our disposal
Thanks for sticking around, and I hope you found it useful :)
Things I didn’t cover in this blog that you can check out or should know
-
Support Approved: Try crafting an elevation rule with “Support approved” and go through an elevation so you can see the flow. It can save you valuable time on one-time configuration changes and one-time install requests - why have the ServiceDesk do this manually when end users can do it themselves? Read more in Microsoft’s announcement of support approved elevations.
- Reporting: Under the Endpoint Privilege Management section in Intune, click “Reports” to see how EPM and administrator rights are used in your org.
- Managed elevation: An elevation rule facilitated an EPM elevation on an endpoint.
- Unmanaged elevation: A local administrator on the device elevated a process without using EPM.
-
Secure Virtual Account: When you elevate a process, it runs in a virtual account that EPM creates, named like this:
MEM\<domain>_<username>_$. This is done for security reasons, and it means the process runs with a separate user profile. Keep this in mind for apps that are installed in, or store settings in, the current user context - elevating them with EPM could cause issues.Support for crafting elevation rules per app, so they run in the current user context, was finally added in October 2025.
-
Missing elevation handlers in the OS: The “Run with elevated access” option is currently only available when you right-click .exe or .msi files in File Explorer. You cannot elevate any other file types, or use “Run as administrator” from the Start menu. You also cannot uninstall programs from Add/Remove Programs, or change system settings in the Settings app. For most of these shortcomings, the workaround is to run
PowerShell.exeelevated and do what you need from there, but that is neither flexible nor user-friendly. -
Windows Store apps requiring elevation don’t work: It’s currently not possible to install most Windows Store apps that require local admin rights. Granted, not a lot of apps require this, so it’s not a big deal unless you have very specific use cases.