

Update Lenovo Devices with Lenovo Commercial Vantage using Intune
A while back I wrote a blog post about how to Update Dell devices with Dell Command Update using Intune, and it turned out to be one of the most read posts on this blog. Every now and then I get the question: “That’s great, but what if we are running Lenovo devices?” - So here we go. In this blog post we will go through how to manage driver and BIOS updates on Lenovo devices, using Lenovo’s own tool, Lenovo Commercial Vantage, deployed and managed with Intune.
Why it’s important to keep drivers and BIOS up-to-date
This topic is still not sexy at all to talk about in IT, but it keeps getting more important. Drivers, BIOS and firmware are no longer something you set once when the device is imaged and then forget about. Hardware vendors ship a steady stream of updates, and a big chunk of them are security fixes.
A few reasons why you should care:
- Security: BIOS and firmware vulnerabilities sit below the operating system. That means your EDR, antivirus and most of your other security controls can’t see or stop an attacker who is living in the firmware. Features like Secure Boot, TPM, Kernel DMA protection and virtualization based security all depend on the firmware being in good shape. Keeping the BIOS up-to-date is the only real fix when a vulnerability is found at that level.
- Stability and performance: Many of the “random” issues end-users report, such as bluescreens, docking station issues, Wi-Fi dropping, poor battery life, or devices not waking from sleep, are often fixed by a driver or BIOS update.
- Compatibility: New Windows feature updates, new docking stations and new peripherals sometimes require a minimum driver or BIOS version to work properly.
- Less noise for the service desk: Fewer weird hardware issues means fewer tickets. Simple as that.
Lenovo Commercial Vantage vs. Windows Autopatch driver and firmware updates
Before we jump into the setup, let’s talk about the elephant in the room. Why not just use driver and firmware updates in Windows Autopatch (formerly known as the driver update management in Intune) and call it a day?
Honestly, for a lot of organizations, that’s a perfectly fine option, and it keeps getting better. But there are some differences worth knowing about:
| Lenovo Commercial Vantage | Windows Autopatch driver/firmware updates | |
|---|---|---|
| Speed of delivery | Updates are available as soon as Lenovo releases them | Depends on if and when Lenovo publishes the update to Windows Update - This can be weeks or months later, and some updates never get published there |
| Update catalog | Full Lenovo catalog for the model, including BIOS, drivers, firmware and Lenovo utilities | Only what the vendor has chosen to publish to Windows Update |
| Extra tooling needed | Yes - an app to deploy and a set of ADMX policies to maintain | No - built into Intune/Autopatch |
| Multi-vendor | Lenovo only | Works for all vendors in one place |
| Approval workflow | Controlled through policies (categories, severity, schedule) | Manual or automatic approval with deferral per policy, with a nice overview of the available updates in Intune |
| Reporting | Local logs on the device (unless you build your own reporting) | Reporting built into Intune |
| End-user experience | Lenovo’s own notifications and reboot prompts | Native Windows Update experience, which ties in with your existing update rings |
So in short: Windows Autopatch gives you a simpler, more integrated and multi-vendor experience, while Lenovo Commercial Vantage gives you speed and the full catalog. If you have a mixed estate or you just want the least amount of moving parts, Autopatch is a great choice. If you want the latest BIOS and security fixes on your Lenovo devices as quickly as possible, Commercial Vantage is still the way to go.
Don’t let both solutions fight over the same updates. If you go with Commercial Vantage for driver and BIOS updates on your Lenovo devices, I recommend just disabling Driver updates via WufB or Autopatch.
Getting started
Download Lenovo Commercial Vantage
First we need the latest version of the Lenovo Commercial Vantage package. You can find it on Lenovo’s support site here.
The download link is easy to miss. Scroll down past the screenshot of the app, and click the “Version xx.xxxx.xx.x (Application and Deployment Guide)” link to download the zip file:
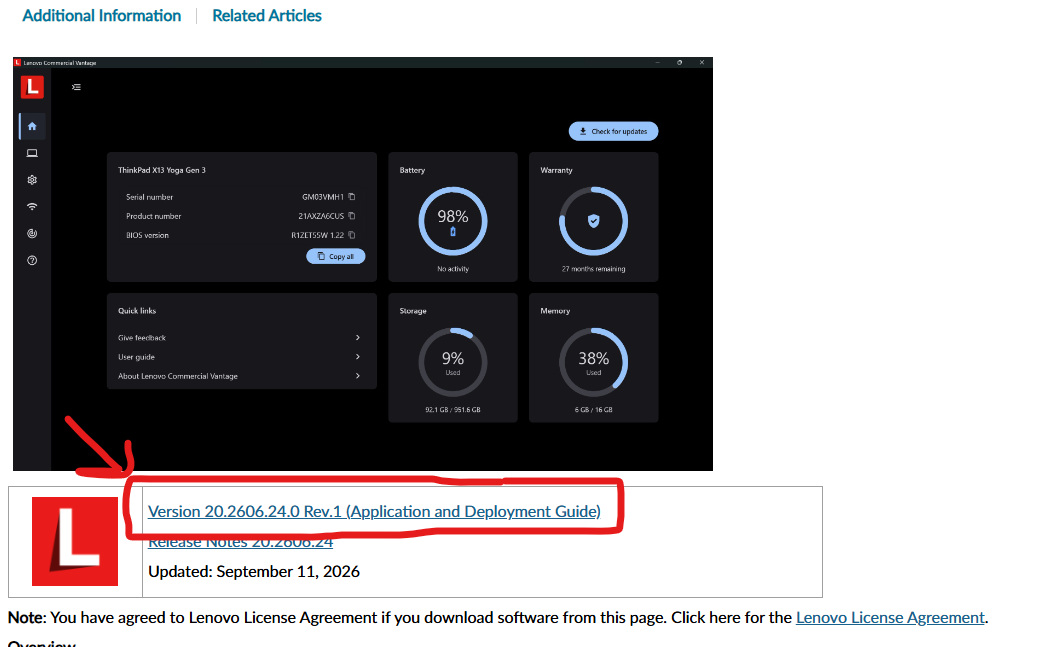
Once downloaded, extract the zip file to a folder of your choice.
Import the ADMX templates to Intune
Inside the extracted folder, you will find a folder called “Group Policy Settings”. This is where the ADMX template for Commercial Vantage lives, and it’s what we need to import into Intune, so we can control Commercial Vantage with policies. You will find the CommercialVantage.admx file, and the matching .ADML file under the en-US subfolder.
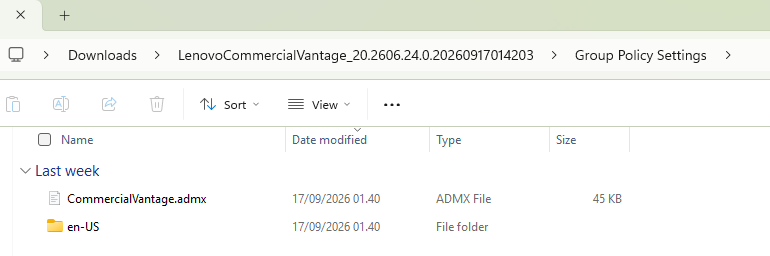
Head on over to Intune -> Devices -> Configuration. Then click the “Import ADMX” tab in the top, and click “Import”.
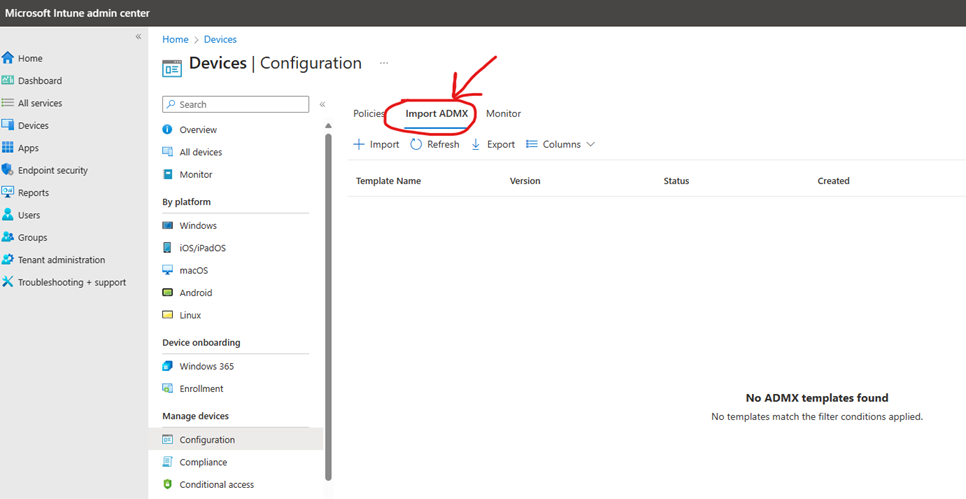
Select the CommercialVantage.admx file from the “Group Policy Settings” folder, and for the .ADML file, you can find it under the en-US subfolder. Then hit next and create. Wait 1-2 minutes, then hit “Refresh” - The template should show as “Available”. As with any other ADMX import in Intune, it can be a bit sluggish, so be patient with this one.
Upload failed? Import Windows.admx first
If you haven’t imported the Windows ADMX template to Intune before, the upload of the Commercial Vantage template will fail. The status will show as “Upload failed”:

If you click on the status, you will see the error details: “ADMX file referenced not found NamespaceMissing:Microsoft.Policies.Windows. Please upload it first.”
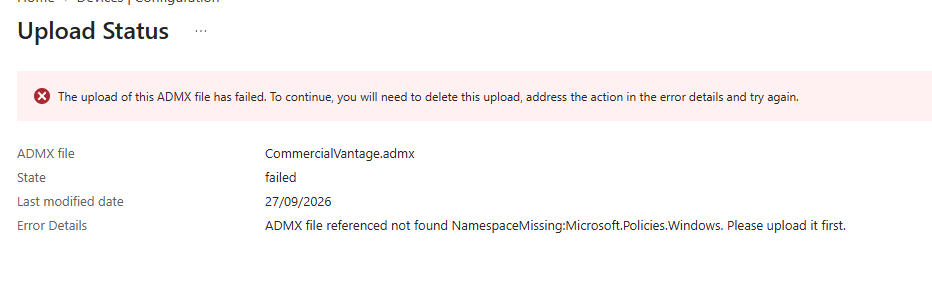
This is because the Commercial Vantage template depends on the Windows ADMX template. To fix it:
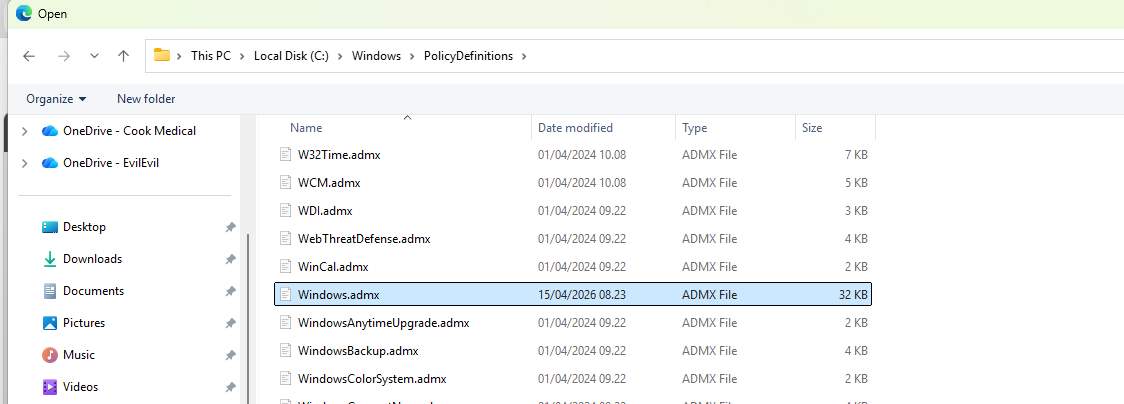
- Delete the failed Commercial Vantage upload (click the three dots on the right -> Delete).
- Import the
Windows.admxfile fromC:\Windows\PolicyDefinitions, and the matchingWindows.admlfile fromC:\Windows\PolicyDefinitions\en-US. - Wait until the Windows template shows as “Available”, then import the Commercial Vantage template again.
Once both templates show as “Available”, you’re ready to move on:

Packaging Lenovo Commercial Vantage as a Win32 app
Now we need to get Commercial Vantage packaged and uploaded to Intune as a Win32 app. Package the entire extracted folder using the Microsoft Win32 Content Prep Tool, with VantageInstaller.exe as the setup file.
You can use below install and uninstall command:
- Install command:
VantageInstaller.exe Install -Vantage - Uninstall command:
VantageInstaller.exe Uninstall -Vantage - Install behavior: System
The install command makes sure Lenovo Commercial Vantage is installed in system context, together with the relevant add-ons it needs.
Detection rule
For detection, we will use a custom detection script. Philip Jorgensen has made a great detection script for Commercial Vantage, which you can download from his GitHub: Detect-CommercialVantage.ps1.
Make sure to adjust the version in the top of the script, so it matches the version of Commercial Vantage you are deploying. Otherwise the detection will either fail, or Intune will think an old version is good enough. Remember to update it every time you package a new version.
Upload the script under “Detection rules” -> “Use a custom detection script”, and assign the app to your Lenovo devices.
Use an Intune filter on the assignment, such as
(device.manufacturer -eq "LENOVO"), so you can assign to your existing device groups without the app landing on non-Lenovo devices.
Deploying baseline policies from Intune
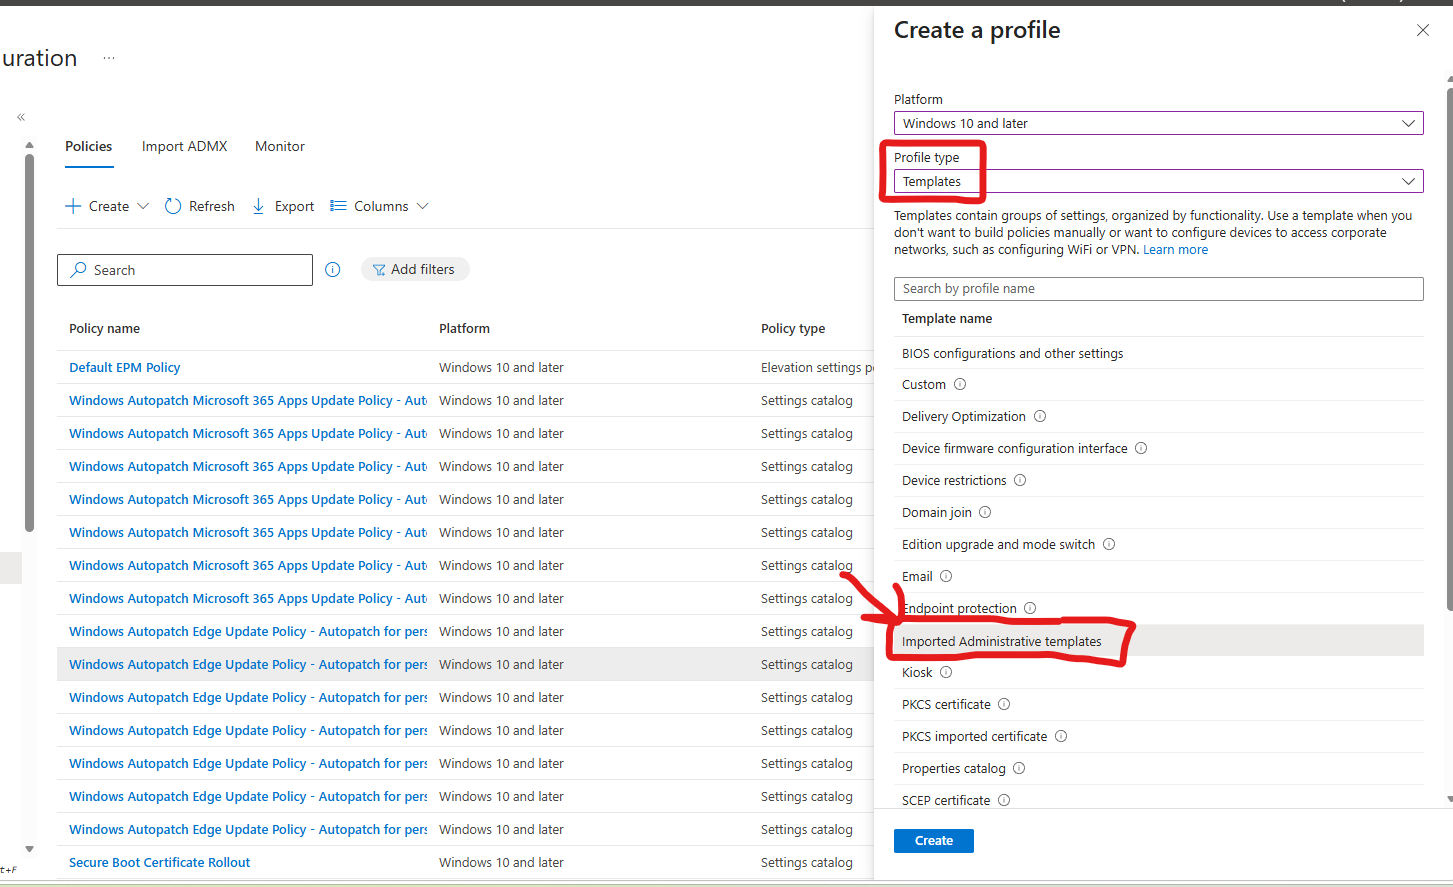
Now for the fun part. Let’s create a new configuration profile: Intune -> Devices -> Configuration -> Create -> New policy. Select “Windows 10 and later” as platform, “Templates” as profile type, and then “Imported Administrative templates”. Give the policy a nice name like “Lenovo Commercial Vantage Update Settings”, and hit next.
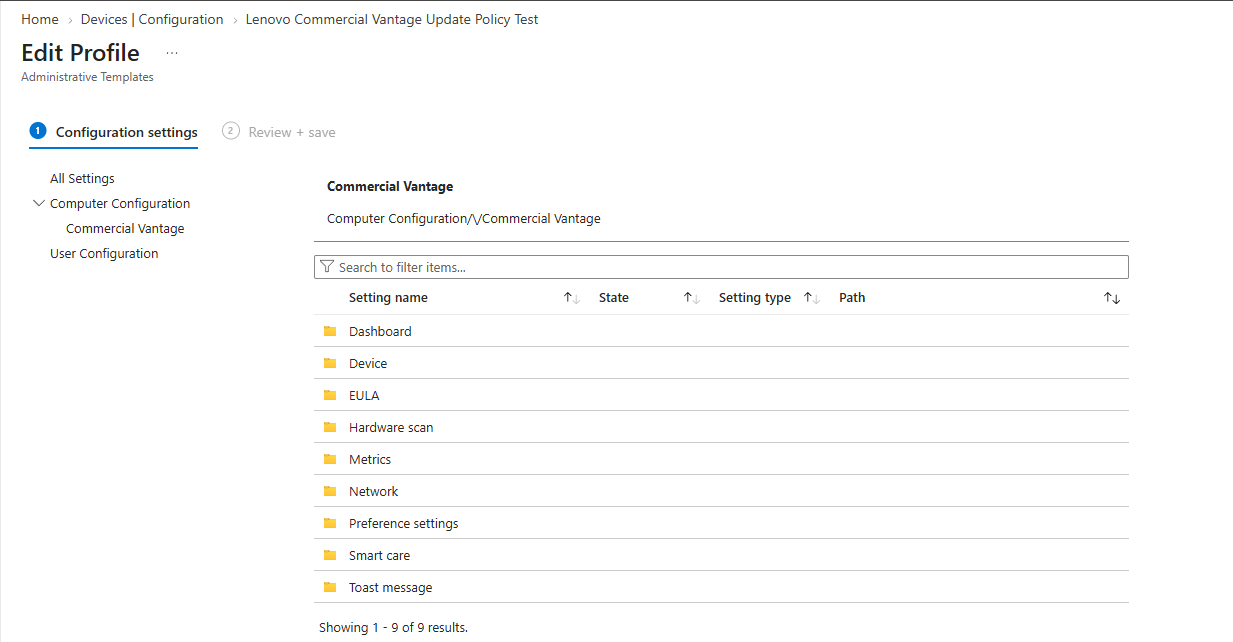
Under Computer Configuration -> Commercial Vantage you will find all the Commercial Vantage settings, organized in folders. The ones we are interested in are under “Device” and “EULA”.
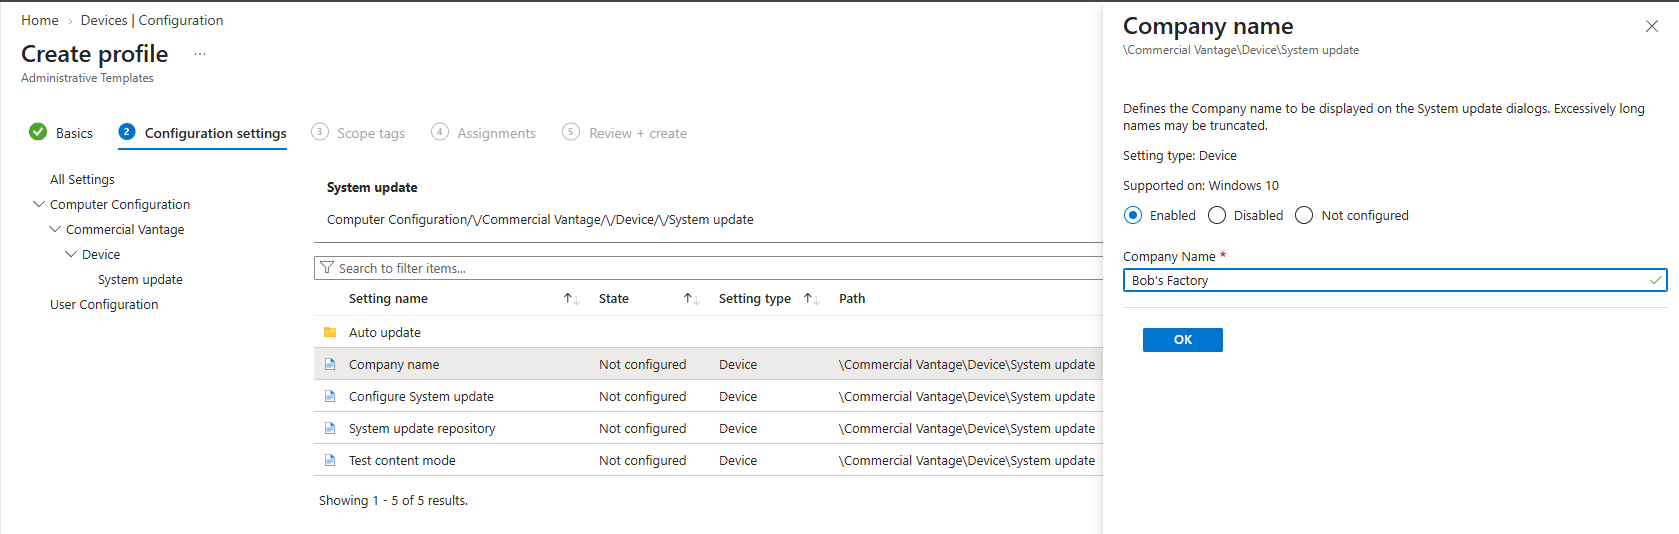
Device -> System update
Company name: Optional, but a nice touch. This is the company name shown in the System update dialogs, so the end-user can see the updates are coming from their own IT department.
Device -> System update -> Auto update
This is where the magic happens. You will find all the auto update settings in this folder:
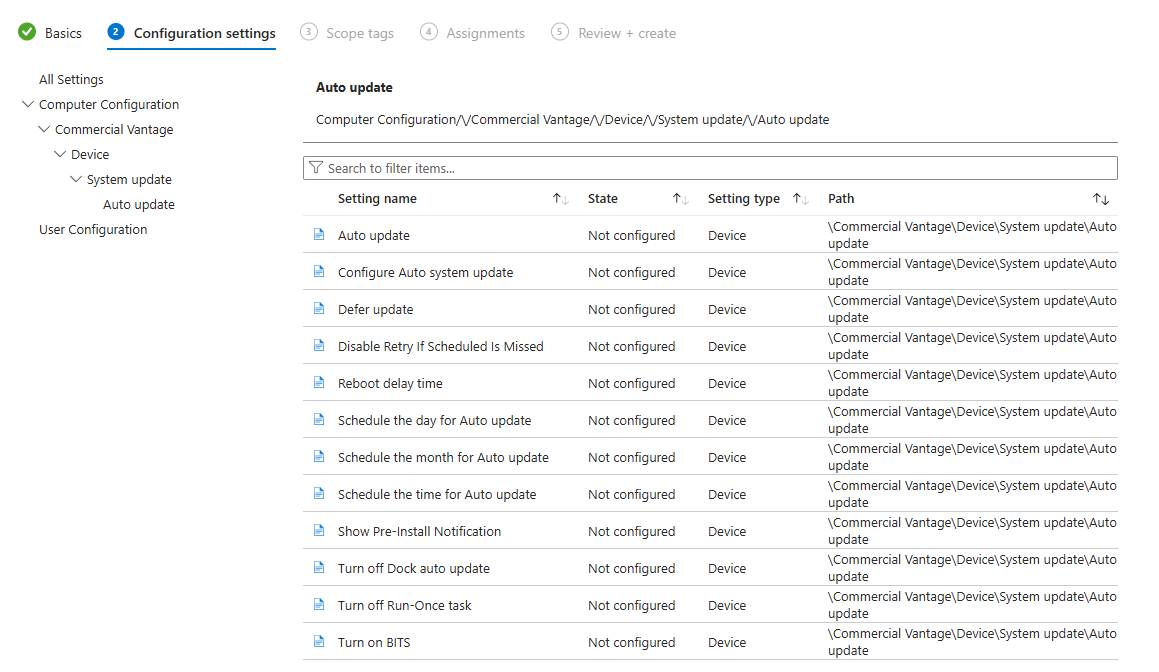
These are the settings I recommend configuring:
“Auto update”: Set this to “Enabled”. This turns on automatic updates in Commercial Vantage, so updates are installed without the user having to open the app and click “Check for updates”.
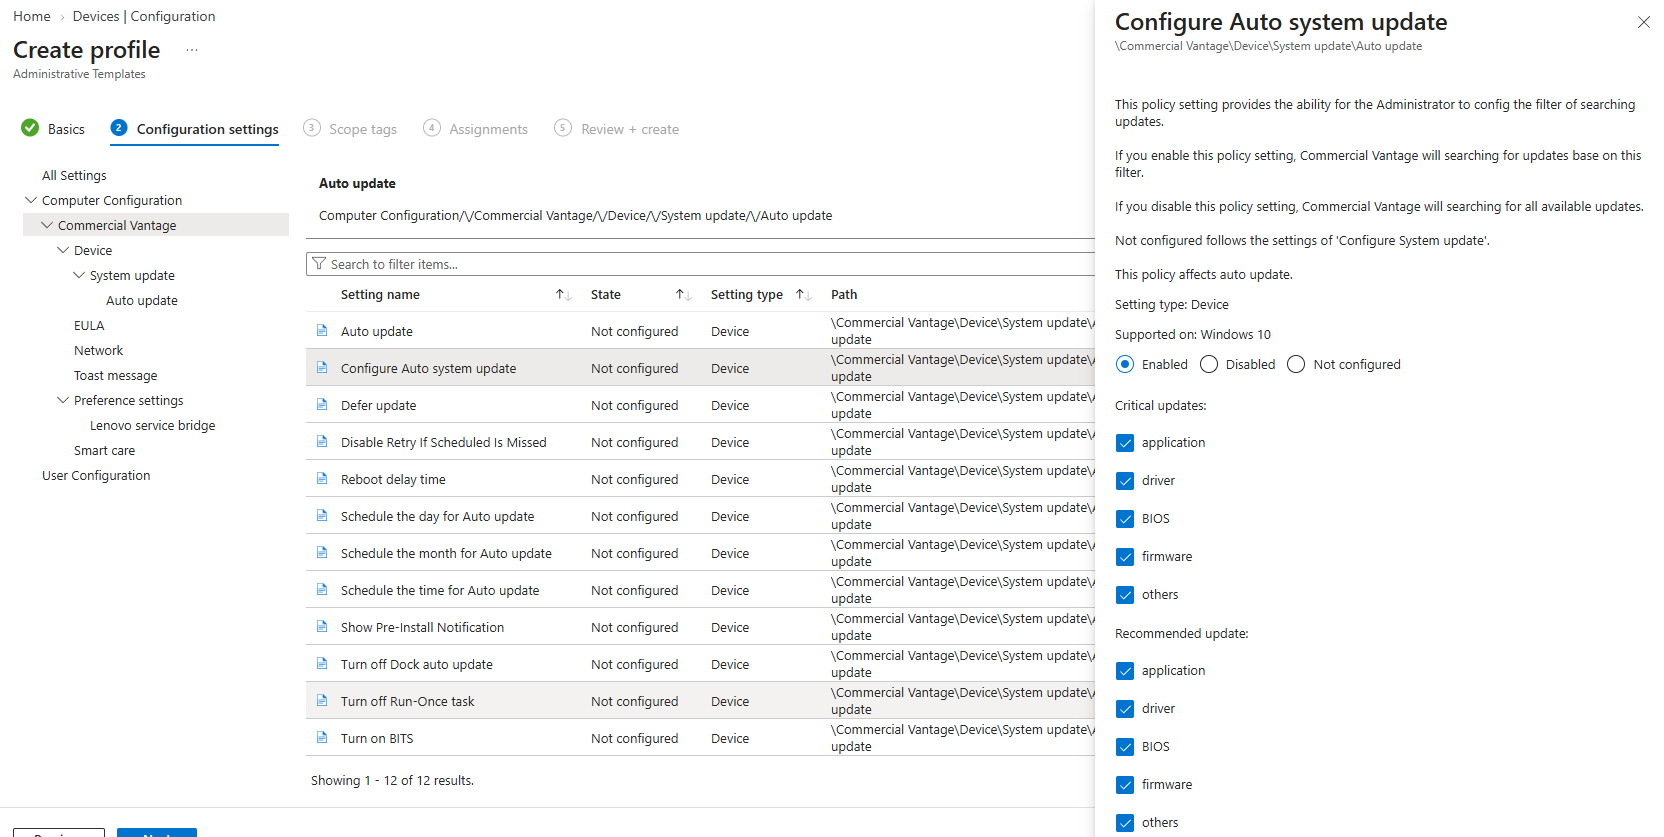
“Configure Auto system update”: Set this to “Enabled” and select all the categories under both critical and recommended updates (application, driver, BIOS, firmware and others), unless you want to filter something out. This controls which types of updates auto update installs. If you leave it not configured, it follows whatever is set in “Configure System update”.
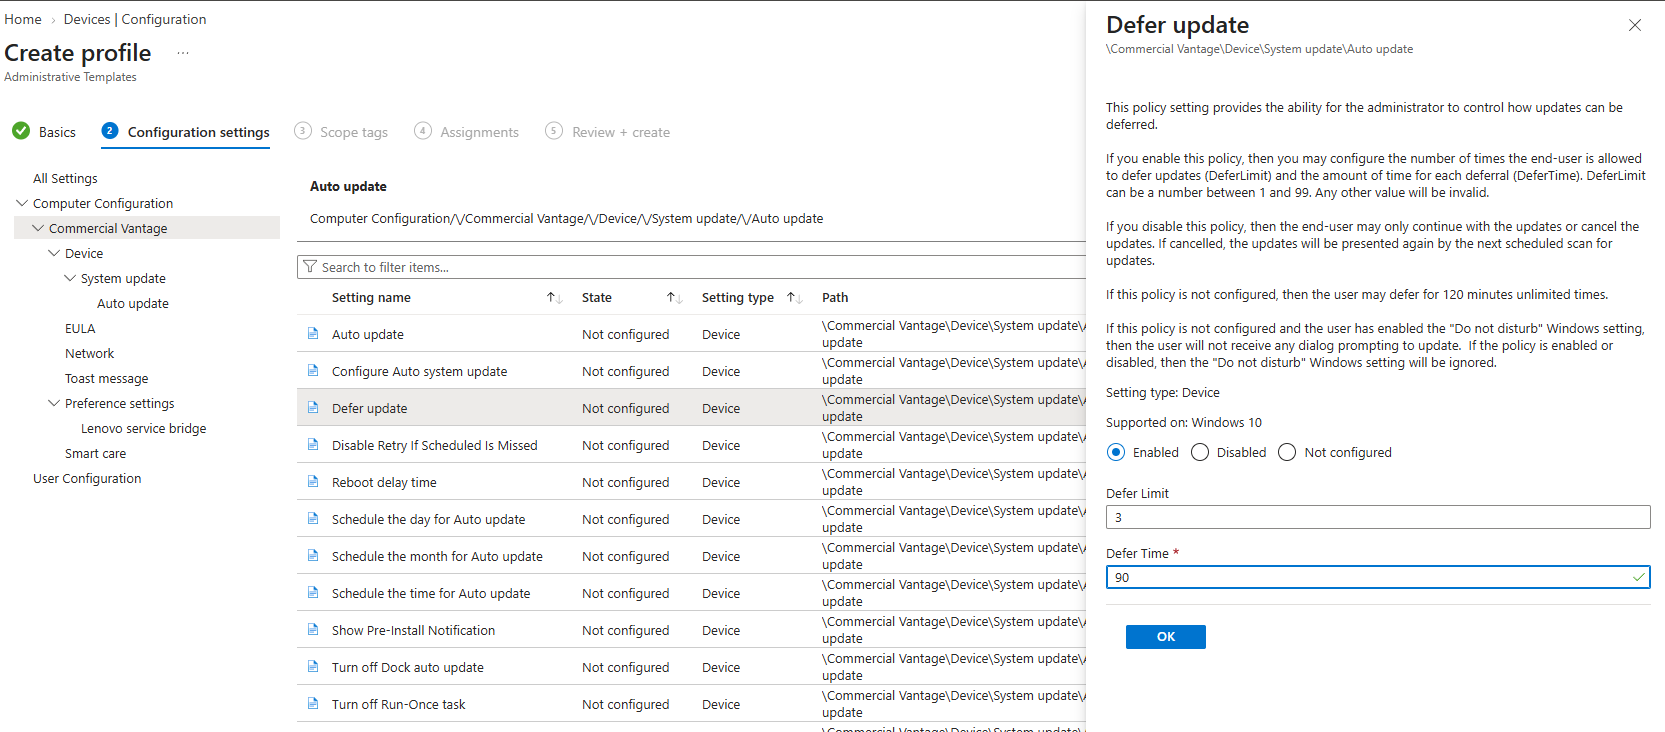
“Defer update”: Controls how many times the end-user can defer installing updates (“Defer Limit”, between 1 and 99), and how many minutes there are between each deferral (“Defer Time”). In the example below, the user can defer 3 times, 90 minutes each.
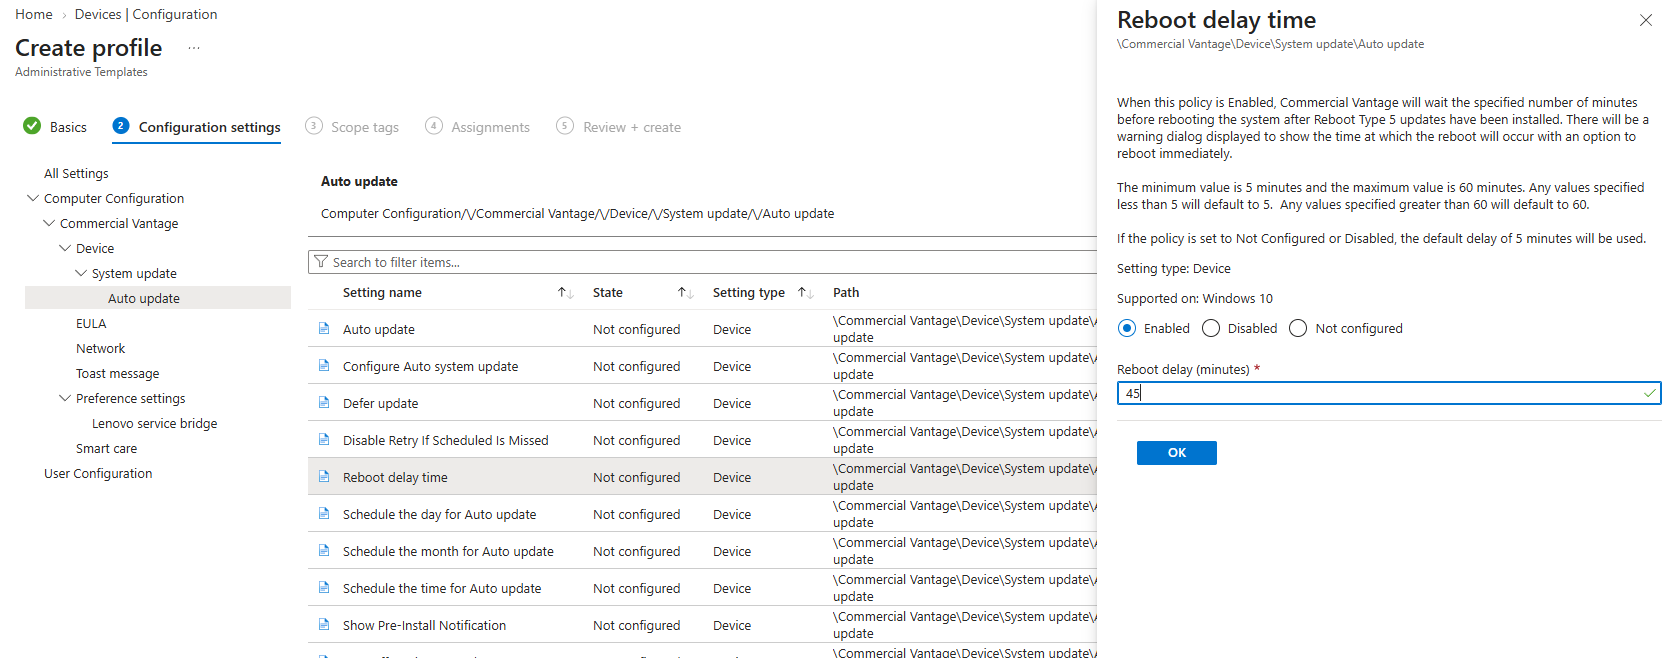
“Reboot delay time”: The number of minutes the user has before the device restarts, after updates that require a restart have been installed (Lenovo calls these “Reboot Type 5” updates). This is the countdown you will see in the restart notification in the end user experience section below. I use 45 minutes in the example below.
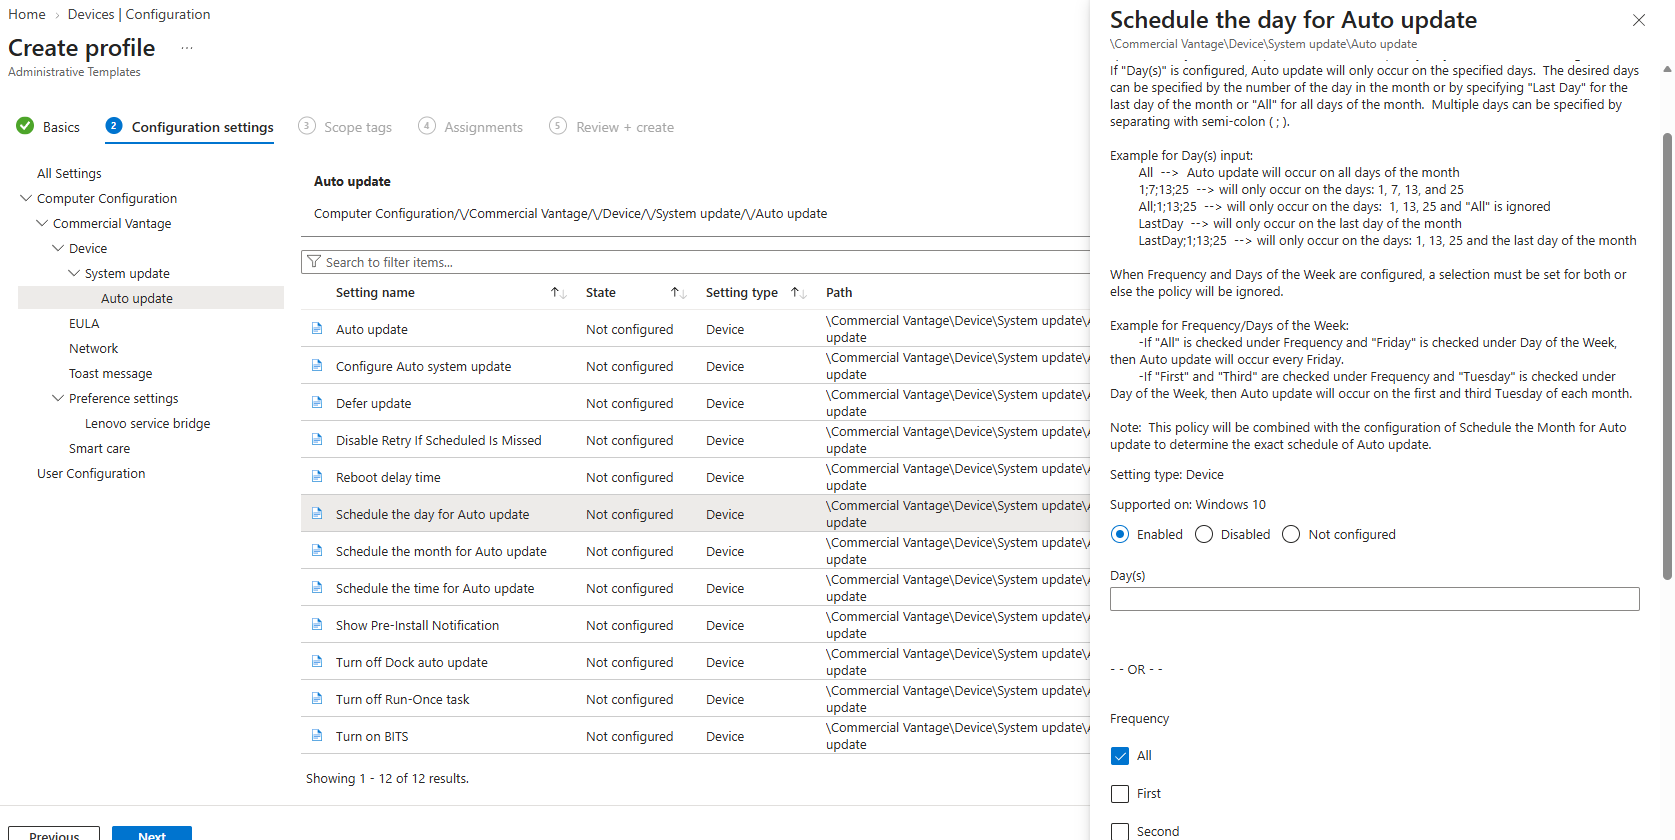
“Schedule the day for Auto update”: Select which days auto update should run. You have two options: enter specific days of the month in the “Day(s)” field (for example 1;15 or LastDay), or use “Frequency” together with the days of the week. For example, selecting “All” under Frequency and “Monday” under Day of the Week runs auto update every Monday. Combine it with “Schedule the time for Auto update” if you want to control the time of day as well.
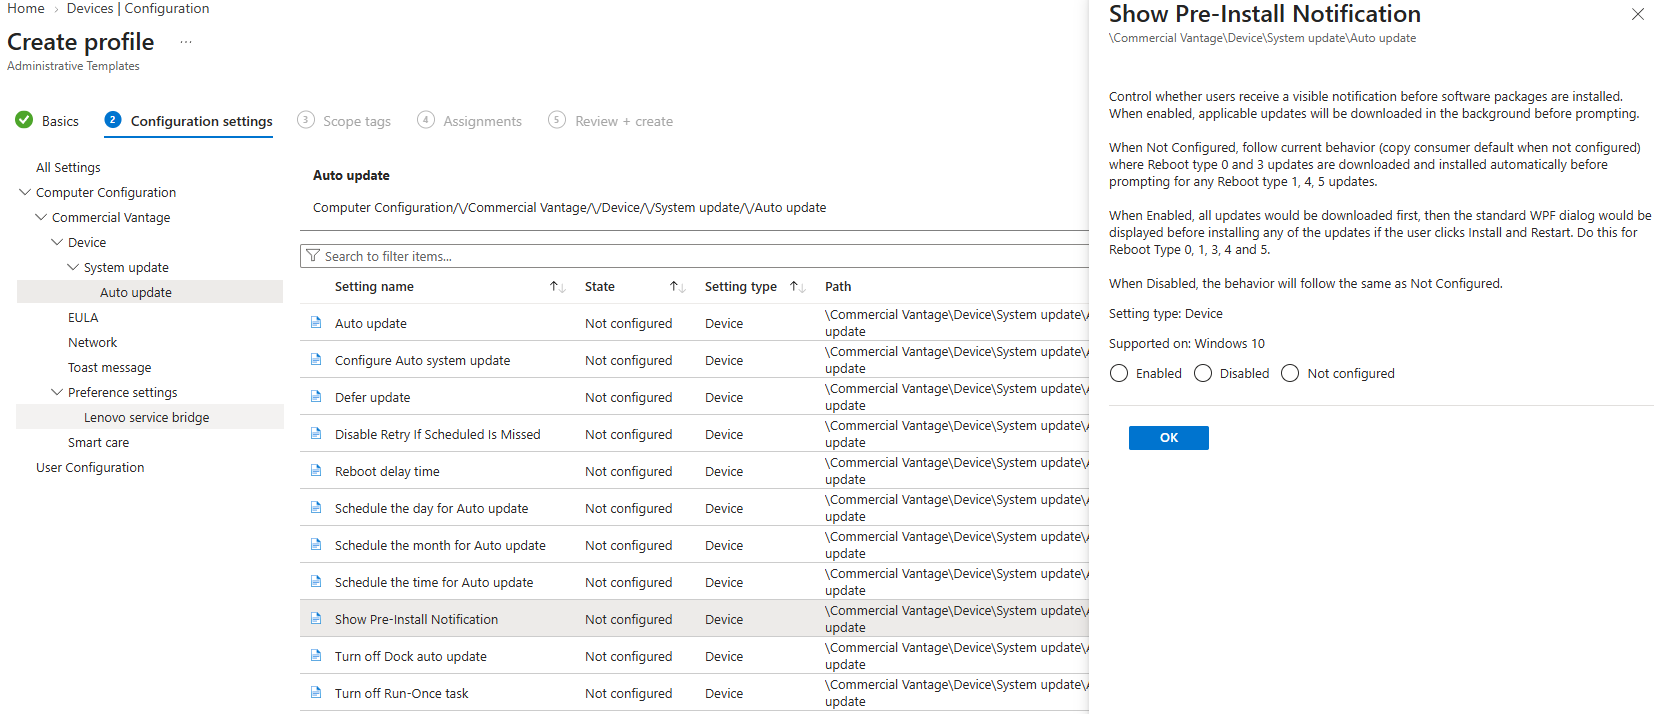
“Show Pre-Install Notification”: Set this to “Enabled”. Updates are then downloaded in the background first, and the user gets a notification before any of them are installed. This is the “New updates are ready to install” prompt you will see in the end user experience section below. If you leave it not configured, some updates (the ones that don’t need a restart) are installed silently, and the user is only prompted for the ones that do.
EULA
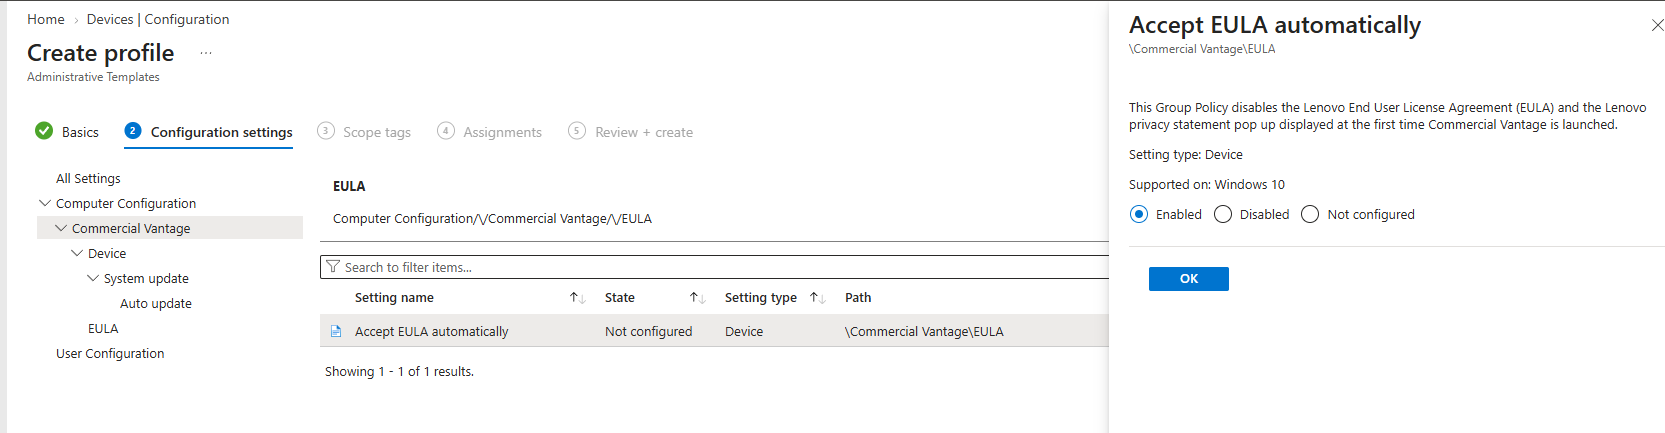
“Accept EULA automatically”: Set this to “Enabled”. This accepts the Lenovo End User License Agreement and privacy statement on behalf of the end-user, so they don’t have to agree to it the first time they launch Commercial Vantage.
Change these settings based on your testing and your org’s needs. The “Defer update”, “Reboot delay time” and “Show Pre-Install Notification” settings are the ones that will have the biggest impact on the end-user experience, so they are good candidates to adjust per deployment ring.
Finally, assign the policy to your Lenovo devices. Just like with the app, use a device filter such as (device.manufacturer -eq "LENOVO") if you are assigning to groups that also contain devices from other vendors.
End user experience
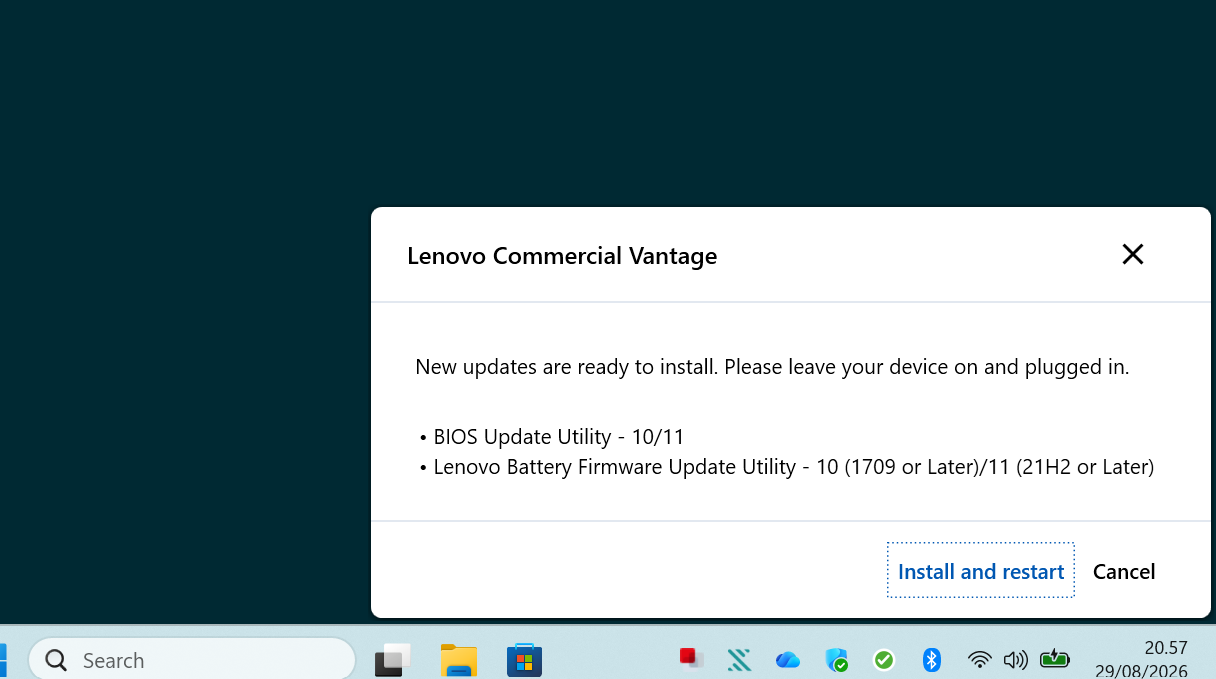
So what does this look like for the end-user? When Commercial Vantage has found updates that are ready to install, the user gets a prompt listing the updates, in this case a BIOS update and a battery firmware update. The user can choose to “Install and restart”, or cancel and do it later. Notice the text asking the user to leave the device on and plugged in, which is important for BIOS and firmware updates.
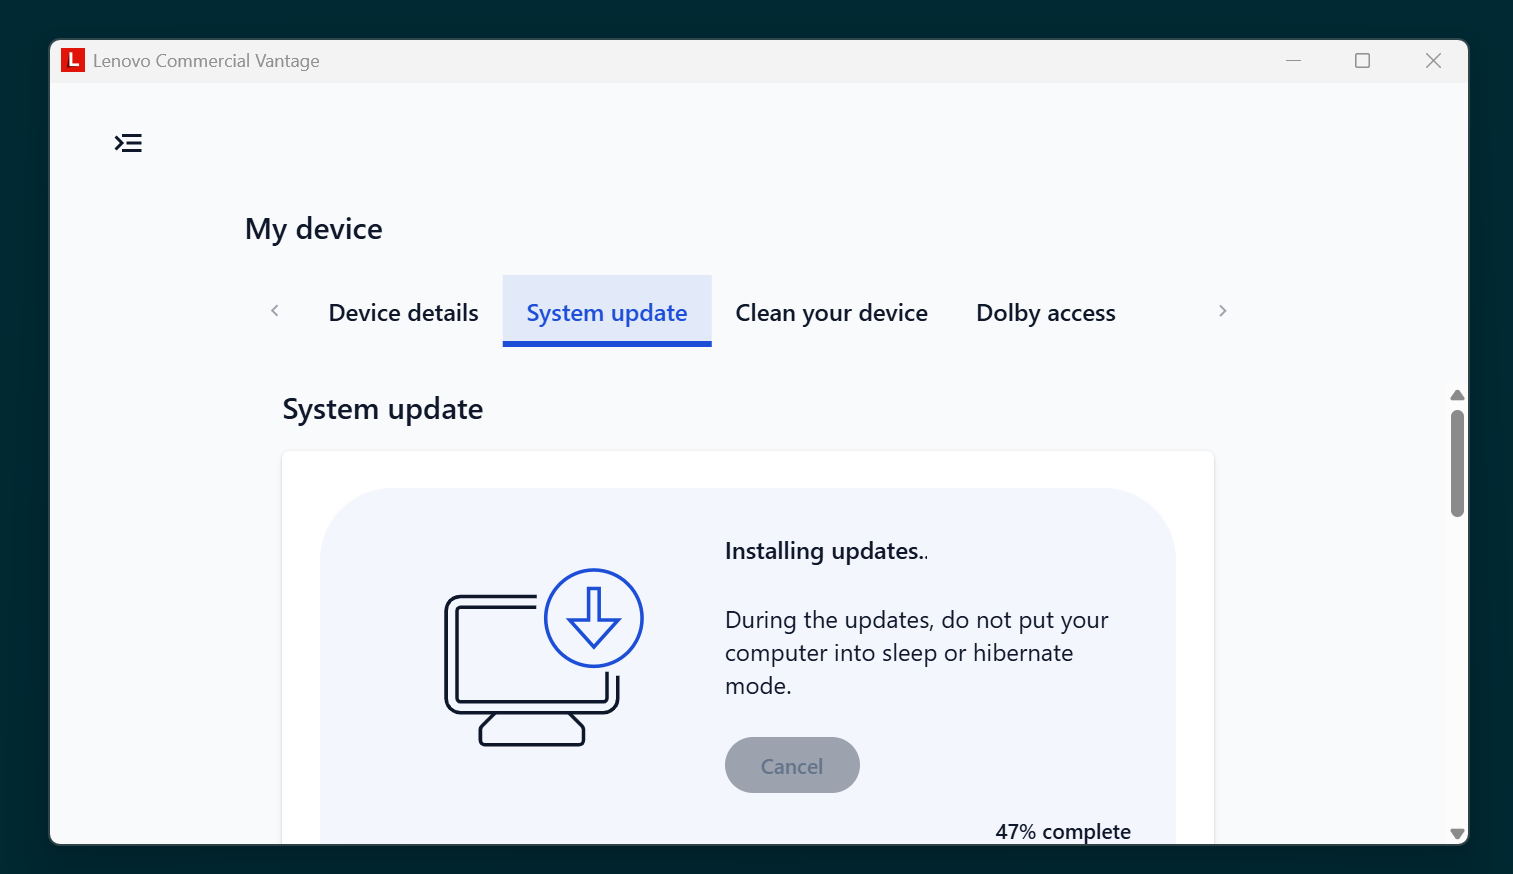
If the user opens Lenovo Commercial Vantage while the updates are being installed, they can follow the progress under My device -> System update:
Once the updates are installed, the user gets a restart notification with a countdown. They can either click “Restart now”, or let the countdown run out, and the device restarts on its own.
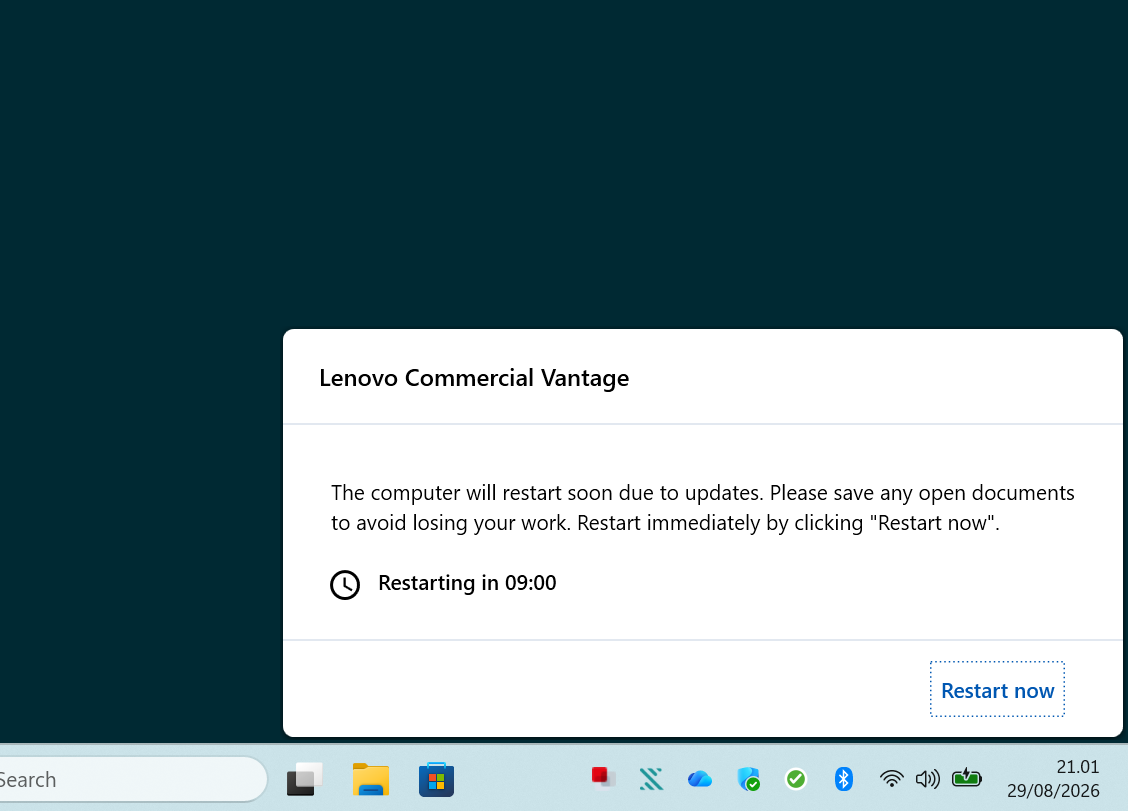
The restart prompt only has a “Restart now” button, with no option to postpone it. Make sure your users know this is coming, so nobody loses unsaved work when the countdown runs out.
Nice to have: Battery and warranty information in WMI
This has nothing to do with drivers and BIOS, but it’s worth a mention while you are in the Commercial Vantage policies anyway. Commercial Vantage can write battery and warranty information to WMI, in the root\Lenovo namespace. That’s really nice for custom reporting and monitoring, for instance with a remediation script, a custom compliance rule, or by collecting it into Log Analytics.
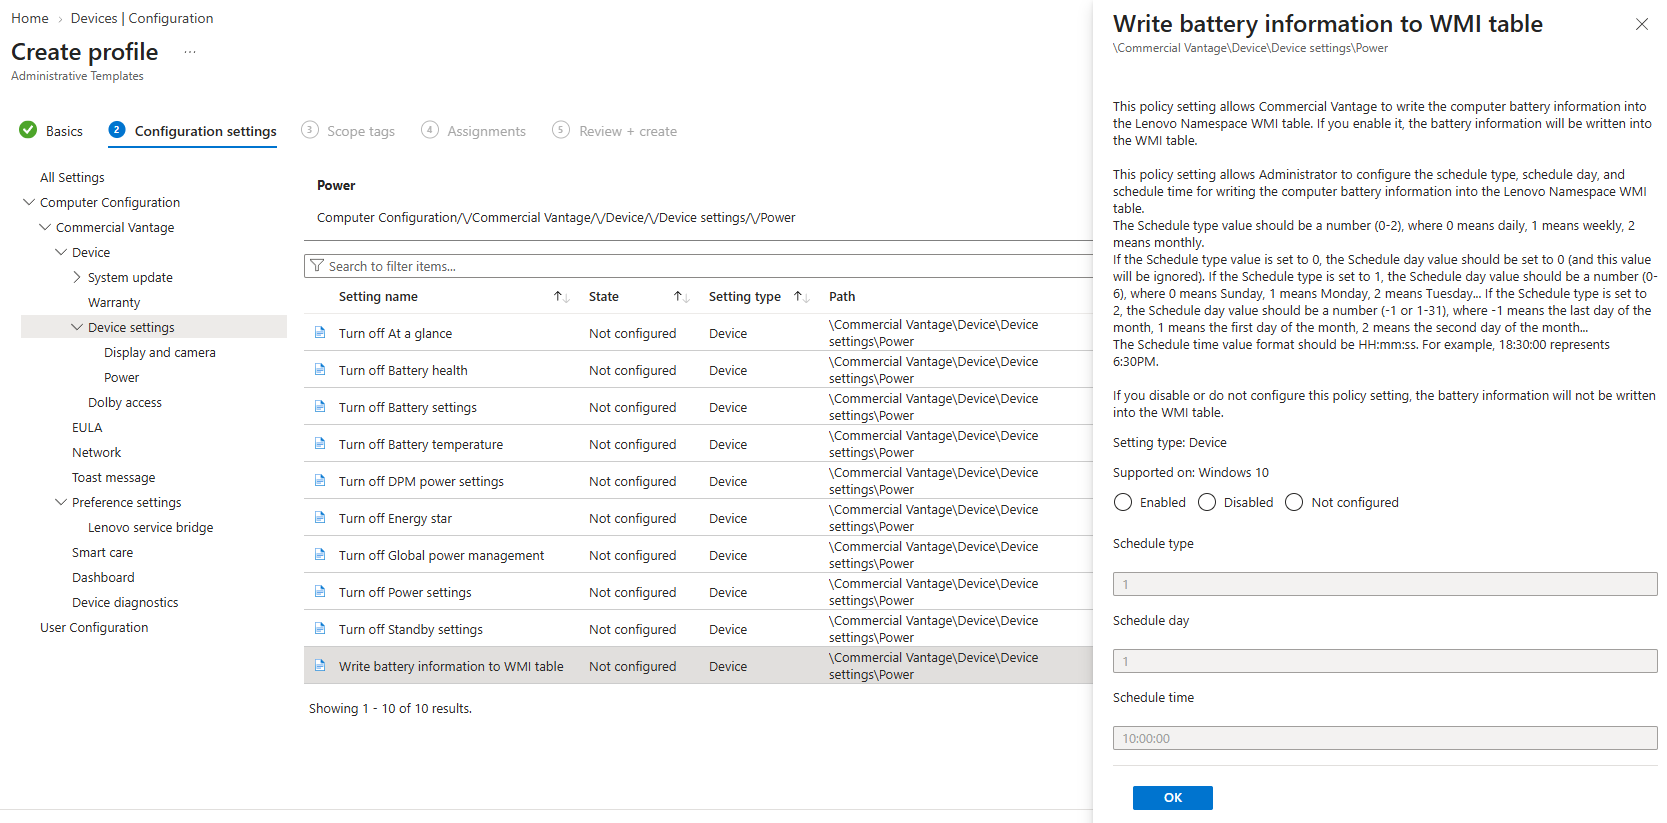
“Write battery information to WMI table” (Device -> Device settings -> Power): Set this to “Enabled”, and configure how often the battery information should be written:
- Schedule type: 0 = daily, 1 = weekly, 2 = monthly
- Schedule day: Set to 0 if the schedule type is daily. For weekly, use 0-6 (0 = Sunday, 1 = Monday and so on). For monthly, use 1-31, or -1 for the last day of the month
- Schedule time: The time of day in HH:mm:ss format, for example 10:00:00
In the example below, the battery information is written every Monday at 10:00.
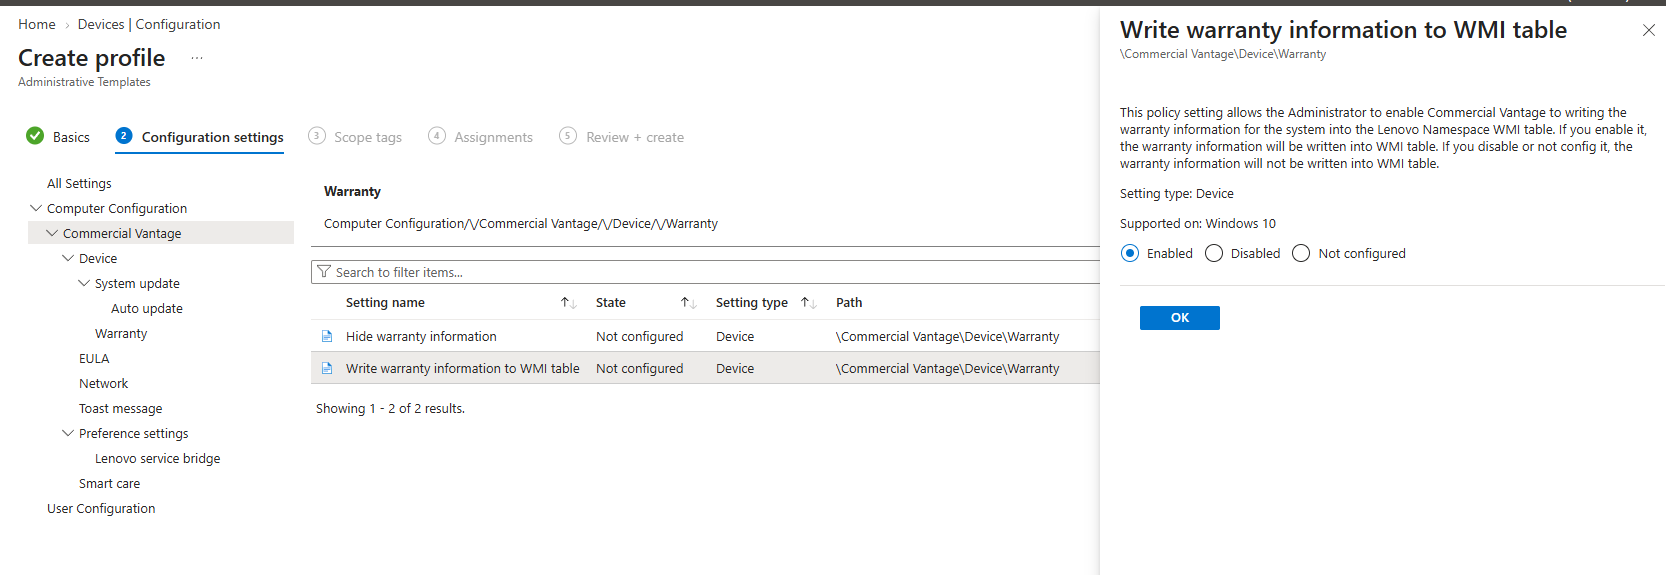
“Write warranty information to WMI table” (Device -> Warranty): Set this to “Enabled”.
Once the policy has applied and Commercial Vantage has written the information, you can query it with PowerShell:
# Battery information - the same information you see in the Commercial Vantage app
Get-CimInstance -Namespace root\Lenovo -ClassName Lenovo_Battery | Format-List *

# Warranty information
Get-CimInstance -Namespace root\Lenovo -ClassName Lenovo_WarrantyInformation |
    Select-Object SerialNumber, Product, StartDate, EndDate, LastUpdateTime

# Details of each warranty purchased for the device
Get-CimInstance -Namespace root\Lenovo -ClassName Lenovo_WarrantyElement | Format-List *
If the classes are not there yet, give it some time. The battery information is only written on the schedule you configured, and the classes are only created once Commercial Vantage has written the information for the first time.
You can find more details about the WMI classes in Lenovo’s Commercial Vantage configuration guide.
If you want to take the warranty information a step further, and get it into a Log Analytics workspace for reporting across all your devices, check out this blog post by Mattias Melkersen: Operationalize Lenovo devices in an Intune only environment. It shows an example of how to build a Log Analytics workspace and ingest the data. Thanks to Mattias for sharing it with the community.
Final words
I hope you found this walkthrough useful. Just like with Dell Command Update, there are pros and cons to using the vendor’s own tool compared to just using Windows Autopatch for drivers and firmware. The Windows Update experience is more integrated and works across all your hardware vendors, but if you use Lenovo Commercial Vantage, you will get BIOS updates, security fixes and driver updates on your Lenovo devices much faster.
A big thanks to Philip Jorgensen and Mattias Melkersen for sharing their work with the community. If you are managing Lenovo devices, Philip’s GitHub repository and Mattias’ post on operationalizing Lenovo devices in an Intune only environment are both well worth a look.
That’s all folks :)